Wednesday, April 3, 2013

Make a Gardening Binder ....

Make a Gardening Binder...

One of my favorite things is gardening, Love It!! So over the last few years I have saved all those tags that came on each plant I have planted, because I plant ALOT and look for them for reference, blooming time and things I may need to know about each plant etc. I had quite the "tag pile" in a large envelope, not organized at all!
 
 So I wanted to make a binder to slide all the tags in so I can see both sides of each tags, but I also wanted to put pictures of my plants and gardens every year because I think it is soooOOooo fun to see how much they grow every year!
 
I bought the binder, binder pages, business card pages and tabs at Walmart...

 I made sections in my binder with perennials, annuals, bushes, trees, vines, bulbs & this spring I will be adding a veggie section after I plant them...I wrote on each tag the year they were planted and where, (for example for right front garden I wrote RF)
Tags that were larger I trimmed to fit all nicely together in the regular binder pages and  just taped them together and slid into the binder pages...
                                          
 
 I added pictures of my plants and gardens in various places of my binders with the year the garden was planted wrote on each picture so I can see where I planted everything and see how much they have grown in future years...

 A lot of nurseries will guarantee the plant for a year so I added a receipt pocket in the back, so if I do have a problem with a plant dying within a year I have the receipts organized and know exactly where to look =)

 To see the back of each tag you just flip to the backside of each page..
 I used some cheap scrapbook paper book I bought at Walmart for $5.oo it had letters in the book also so I glued them to the paper to personalize the decorative paper and slide in the binder covers and side...
This project was actually REALLY fun (no deep cleaning before hand or anything:) Just sat down at my kitchen table and got to work....I love flipping through the binder and now I have a spot for all future tags ( I plan on planting ALOT this summer...again...) and will add more pictures to it every year...I love seeing how much my plants grow...Can't wait for summer!!!!


Wednesday, March 27, 2013

Organizing Girl's Closet ...

Organizing Girl's Closet...

This is my finished basket project for my girls' closet... I have 2 daughters that share a bedroom...We are lucky enough to have a walk-in closet in their rooom, however it would still get to the point where we couldn't walk in there, I didn't have enough hanging space for our youngest's clothes, and nothing in there had a "spot"..
 I lOVE light green with pink, so I picked up more baskets at dollar tree for 1 buck each...
 I went to walmart and bought a book of cardstock paper for $5.oo, some letters for $3.25 a pack (I wanted to try something more fancy instead of writing my own), and a roll of decorative
ribbon (not wired)
..I love the pink damask design!
 I wrote down what I needed baskets for and made sure I had enough letters etc.
 I used a circle cutter to cut the cardstock, glued them together, added the letters then I used my laminater for the tags (you don't have to laminate, I just happen to own one) I then punched a hole at the top of the tags..
 I used the decorative ribbon to tie the tags to the baskets..
 I also picked up a closet rod extender at Menards for $3.49 now we have much more hanging space on the younger daughter's side....
I also purchased a shoerack from walmart for about 10 bucks that is on their closet door that holds all their shoes and boots!
I can't believe this was the most nightmare closet in our house before and now it's my favorite!!
SoooOOooo Pretty I just lOve this closet now!!!!!


Organizing Boy's Closet...

Organize Boy's Closet ...

 For my son's closet I picked up red baskets at dollar tree for $1.00 each!
 I added chalkboard labels and tried to make a spot for everything..
 I also found these smaller bins at dollar tree that work great for smaller items..
 You know since I finished this I haven't heard him ask once "has anyone seen my charger?" when he is done with an electronic he puts it in the "electronic" basket...
 I love the Bold, Bright Red Baskets...
I did this about a month ago and I have not seen anything on the closet floor so I must of given him "a spot for everything" so I would say this is working out great ;)


Kid's Craft Cupboard

Kid's Craft Cupboard


So another area I had to work on was the cupboard under our kitchen counter/ on the dining room side that all the kid's craft stuff was getting thrown in, this is my finished project...
 I had to keep this cupboard as the kid's craft cupboard because they want to be in the kitchen/dining room table when they color and do projects, so of course it is easiest to make this the "permanent craft cupboard" ...

I found all the baskets at dollar tree for 1 buck each of course! I added chalkboard labels that I made myself from chalkboard contact paper and wrote on them with a chalkboard marker. I actually found the magazine holders in Target's dollar section for a buck each also!!!
I finished this a couple months ago and I have not had to look for a scissors or glue since! The kid's love it!

Measurement Conversion Chart on Kitchen Cabinets....

Who would of thought you could even use space on the inside of your kitchen cupboard doors to organize? I saw this vinyl measuring chart with the cups & spoons words online and knew I wanted to do this!! Now I can easily find my measuring cups and spoons and the best part it is soOOooo cute!! 
 
 I ordered the chart & words from Say it on the Wall for $15.00, we used the inside of 2 kitchen cabinet doors for the project one for the chart & cups and the door next to it for the spoons...
My husband and I went to our home improvement store and found some scrap wood, bought a can of red spraypaint and picked up some hooks and screws... 
I had him cut the wood to the widths we desired and we spray painted it red, we let it dry and we then screwed in the hooks we picked up at the store...
We then applied the vinyl words to the wood pieces and the measuring conversion chart to the cupboard door...
 Then we lined up the wood and screwed the wood pieces to the inside of the cupboard doors.
I lOve, lOve, lOve the way this turned out!!!!
 
I bought the combo pack (chart & labels) however I did see they sold just the chart alone also (if you didn't want the labels)..
 
and also the label set alone (if you didn't want the chart)..
 
I used both in this project...


Tuesday, March 26, 2013

Organize Papers in a Kid's Memories Box

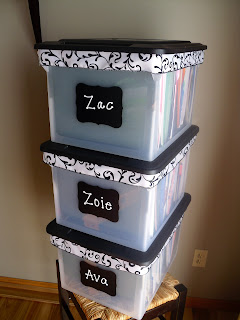
My next organizational project was a MUST-DO...I have always saved those report cards, favorite art projects, pictures, times they were in the paper and certificates etc. in 2 big rubbermaid bins! They were just thrown in there over the years knowing in the future 1-day I would separate into a pile for each kid and do something with them? Just wasn't sure....Well I finally did it!! As i have 3 children I needed 3x the materials right, so I wanted to keep the cost down, as I have ALOT more projects ahead of me...I found these larger file boxes at walmart for just $5.00 a piece!!! WoW! I also bought hanging file folders..I knew I wanted them to be "pretty" too, so I walked down to the ribbon section and bought damask ribbon (love damask:)) I needed 2 rolls of ribbon for 3 bins so the ribbon was less then 6 bucks...
First I wanted to get the bins ready before going through my totes of memories I saved, so I began with hot glue-ing the ribbon around the top of the bins. This was actually REALLY easy I thought and I was so happy with how they turned out!!
Next I wrote each child's name on a chalkboard label (I made about 100 of these on an earlier date using chalkboard contact paper and a friends cricut machine) and applied one to each bin..Just what I had in mind =) I love when things go as planned ;)
Now it was time to put in the hanging folders and label them, I found that I did actually save alot of stuff of course from baby and toddler classes and preschool so I made one file for baby/toddler, then preschool, Kindergarden, 1st grade, etc.  I have more then enough room in the bins to put everything in through at least 12th grade! They are so pretty and fun to look through that I can't take myself to take them out of my main level of my home yet and put them away!
I am very happy with how these turned out and now I have an organized spot to put those "special" memories that my kids bring home....
 

Keep Kid's & House Papers Organized!!!


So my first area of our house (probably the most important) to organize was the paper pile box by the front kitchen window. I needed to set up a "system" that keeps them organized. I knew if I tried to keep papers coming in somewhere other then the kitchen it wouldn't work,  I would just create another paper pile by the front kitchen window...I knew I wanted magazine holders (1 for each child) and a separate one for the "house" papers coming in....I bought 4 black magazine holders from Target for 5 dollars a piece and 2 packs of decorative folders..I wrote each child's name on the label part of the magazine holder and on the 4th one I wrote house...
For the KID'S magazine holders..
The idea is for the decorative folders each be labeled each activity the child may be in and of course a school folder...then when they come home with permission slips, homework and notes they go straight into THEIR OWN school folder...
For the HOUSE magazine holder..
I went through that paper pile and looked to see how to I have a spot for everything I quickly found out how many folders I needed so that everything had a place..
1.Coupons (those coupons that come in the mail, papers, check out at stores)
2.Papers to file (pay stubs, papers I am saving from the kids, anything that needs to go downstairs to my filing cabinet)
3.Bills
4.Pictures the kids made me (this was important as I have 2 daughters who LOVE to make me pictures and cards at home, I put them all in this folder and grab my favorites and put them in their memories bins (I will show you the bins on a later blog;))
5.Things to read (papers I need to read)
I like these in my kitchen because let's face it I live in the kitchen and it's by the front door, where they empty their backpacks and mail gets set, I have had this system for a couple months now and doing this has saved me sooOOOoo  much time from trying to find papers we need, I just simply locate the folder that ballet form is in that needs to be signed and I knew exactly where it was!!! Ahhhh!! So this is the project that got me excited and pumped to make my WHOLE house organized!!!!